Table of Contents
Proxmox LXC Containers with Audio and Giocoso
1.0 Introduction
I've recently moved to using Proxmox as my virtualisation platform: it is based on Debian and thus uses Linux's native KVM hypervisor capabilities (the previous virtualisation technology I was using), so it's generally quite straightforward, but with a nice web UI making things very point-and-click. A refinement of this, however, was a technology that I'd never actually used before: LXC Containers. These are incredibly lightweight, minimal virtualised environments, rather than the full-fat virtual machines that I've used for about 26 years now!
When I'm testing new builds of Giocoso, Semplice or Niente, it helps to be able to knock together a slim environment in which to check I haven't badly broken anything: LXC Containers are much speedier to deploy than 'proper' virtual machines, so this was definitely a technology I wanted to crack.
The “problem” with containers is that they really are minimal: they come with no GUI, no audio, no nothing that would allow a music-playing program like Giocoso to operate effectively… which rather seems to defeat their intended purpose! Fortunately, it's fixable and with a bit of command line shenanigans, you get to have the simplicity of a container with all the graphical and audible tools needed to be useful.
However: the “shenanigans” involved are really quite elaborate and complex shenanigans and this is definitely not for the faint-hearted! Each distro has its own quirks and peculiarities. I'll document those for Arch, Fedora, Ubuntu and Linux Mint: the same principles then apply to any other distro, but the specifics will need to be worked out by yourself according to what otherwise breaks or works!
I'll begin by discussing two ways of adding shared, on-the-network storage to your Proxmox environment: managed storage and un-managed storage. This is something you'll do once-only to your Proxmox host and all your containers will benefit from it thereafter, so it's as well to get this out of the way up-front before tackling distro-specific container issues.
2.0 Adding Managed NFS Storage to the Proxmox Host
NFS storage is added to a Proxmox environment in two distinct ways, depending on whether you want Proxmox to manage them or whether you just want Proxmox to access them (perhaps even in read-only mode).
Managed network storage is created via the Proxmox web interface; unmanaged storage has to be created using the command line. Managed storage is what you want when you need to back up your containers and virtual machines: it's storage that Proxmox will create a number of folders in and keep an eye on automatically once it's been created. This is not, therefore, how you get NFS storage visible to containers and virtual machines: it's only network storage that the Proxmox host itself will be able to see and use.
So, with all that out of the way, we start with this situation:
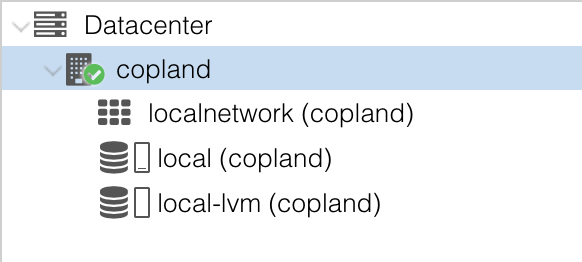
That's a fresh Proxmox installation with local storage only. To add a storage location on the NAS which Proxmox will manage (and create a bunch of subfolders in), it's sufficient to click on the Datacenter → Storage options, click [Add], then select NFS from the drop-down. Fill in the details of the server and the share, like so:
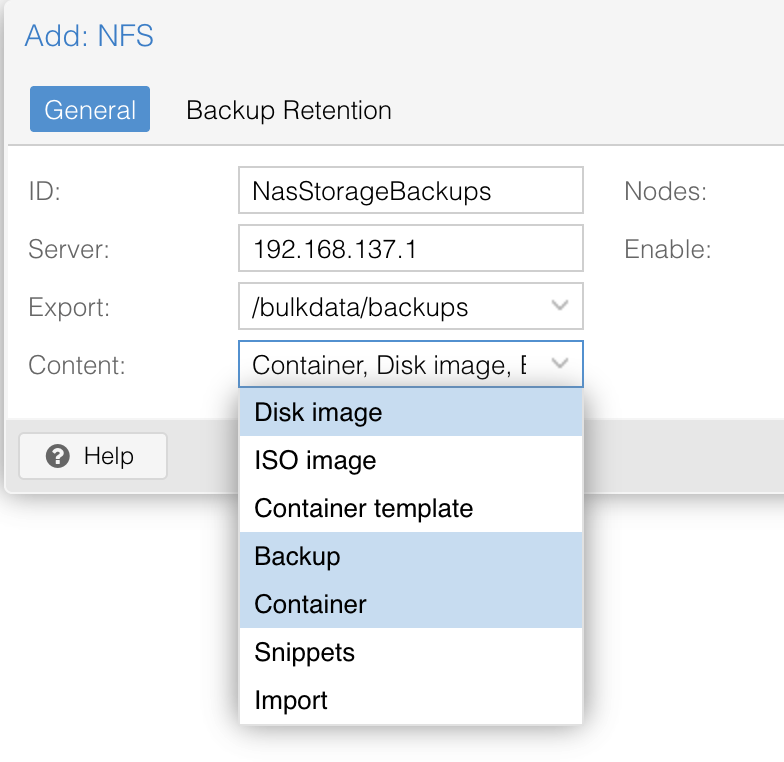
The 'Content' field is the important bit: it defines what Proxmox can store on the share and what it expects to find there (and what sub-folders it will create there). If you say content is 'backup', for example, it will create a 'dump' folder and your backups of containers and VMs will be stored there. If you want to upload an ISO to the NAS, that would require you to select the ISO Image content type, and so on.
In my case, I actually only want this mechanism to allow containers to be backed up, so I select only the Backup content type. Click [OK] to submit the selection and I end up with this sort of thing:
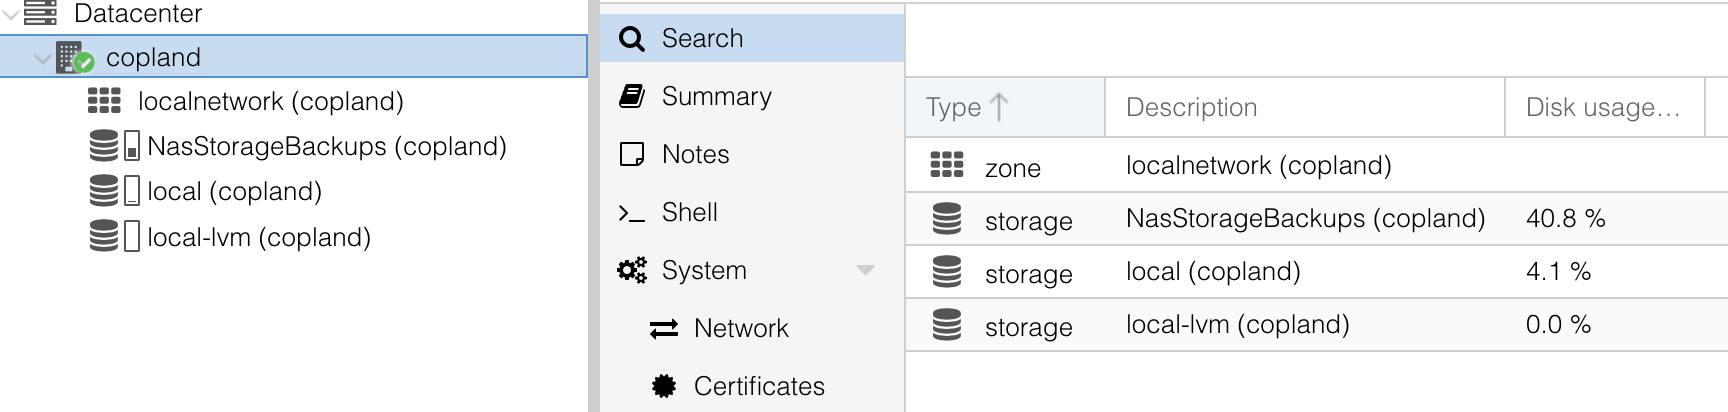
My 'Copland' host is allowed to see the NAS for backups and restores -and that's it.
3.0 Adding an unmanaged NAS Share to the Proxmox Host
So, now click on the Proxmox host item in the Web Gui (i.e., the one directly under 'datacenter': in my case, that's “Copland”):
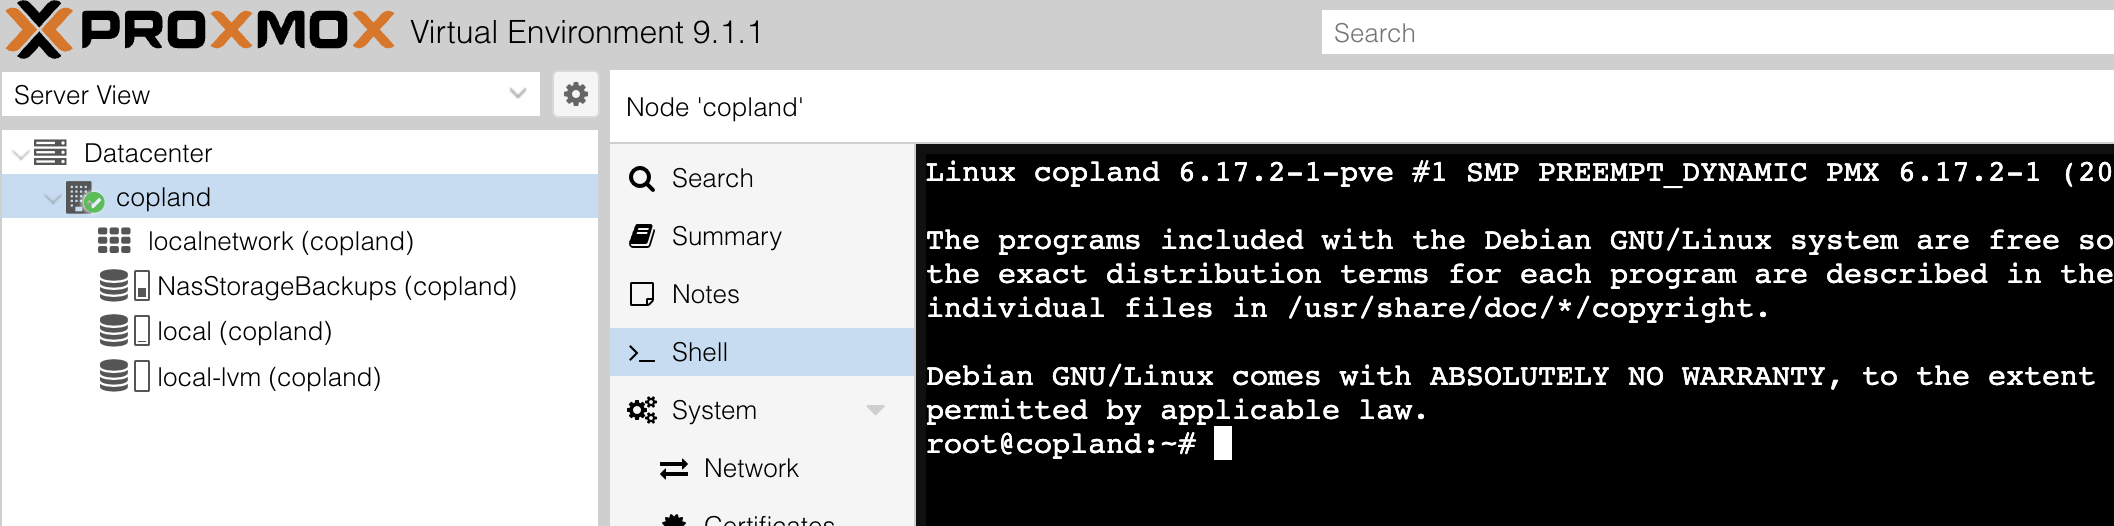
Visit the Shell item in the middle pane and you'll see a command line interface on the right, with you logged in as root. You now create a mount point on the host, as follows:
mkdir -p /mnt/nas_music
(The specific name of the mount point doesn't really matter, but “nas_music” is good enough here).
You then issue a variant of this command:
echo "192.168.137.1:/bulkdata/music/ /mnt/nas_music nfs rw,hard,intr,rsize=131072,wsize=131072,timeo=14 0 0" >> /etc/fstab
That's assuming your NAS has IP 192.168.137.1, and that it's exporting the music collection at /bulkdata/music. This entry in the fstab file says 'mount that share on that NAS at the local mount point /mnt/nas_music, which I just created'. The long list of options (such as “rw,hard” and so on) are there to make fetching data across the network between the NAS and Proxmox as efficient as possible.
To actually mount the share, you then issue the command:
mount /mnt/nas_music
You will probably be told that “ount: (hint) your fstab has been modified, but systemd still uses the old version; use 'systemctl daemon-reload' to reload.” If you see that message, just issue these commands:
systemctl daemon-reload
mount /mnt/nas_music
You can then check that the Proxmox host now “sees” the music folder structure you're expecting it to see:

Once the Proxmox host can see the music collection, we can make containers see it to.
4.0 Making a Bind Mount
I created an Ubuntu 25.04 container, using a downloaded template. I built it as a privileged container: the default is to be unprivileged, so you have to actively uncheck that option on the first screen of the container builder wizard. That also disables nested virtualization by default (running virtual machines inside the container). The GUI doesn't let you have Nesting if you've unchecked the Unprivileged container option, though you can re-enable Nesting after the container is built if you feel you need to.
Once the container is built, go back to the Proxmox host's shell (that's Copland on my setup, then click Shell in the middle pane) and issue the command:
pct set 100 -mp0 /mnt/nas_music,mp=/mnt/music
That “100” is the ID of the freshly-built container, so change it to match whatever ID is assigned to your new container. The rest of the command says that the hosts mount point of /mnt/nas_music should become the mountpoint /mnt/music within the container. This isn't being managed by the usual /etc/fstab mechanism: this is Proxmox forcing a mount into the container. This arrangement is called a bind mount.
Bind mounts can be created with the container running, but they don't take effect until the container has then bounced down and back up. I created mine with the container closed down anyway, so I can now just start mine up.
Once it has started, I can click on the container's Console option and see this:

This “injection” of a mount point into a container 'from the outside', as it were, is what's called a 'bind mount'. A standard mount at the Proxmox host level is made available to a container running on that host without any fiddling with the container's /etc/fstab. More importantly, the way a bind mount is created is entirely independent of the operating system the container is going to be running: it's always done in the host's shell, using the “pct” command. The container number will be different each time, but the command syntax is invariant.
5.0 Instructions for Building a PulseAudio Server
PCs with a pair of speakers can offer their audio rendering capabilities to containers that are outputting an audio stream. Your desktop PC can therefore act as a PulseAudio server, whilst the container acts as the PulseAudio client.
5.1 A macOS Audio Server
First, install and start PulseAudio. If you use HomeBrew:
brew install pulseaudio
brew services start pulseaudio
If you're more a MacPorts person:
sudo port install pulseaudio
sudo port load pulseaudio
After that, edit /opt/homebrew/etc/pulse/default.pa. The path will be different for MacPorts users: maybe /usr/local/etc/pulse/default.pa on older OSes, or /opt/local/etc… if you're running on something like Tahoe and thus using a newer MacPorts version).
Find the lines
load-module module-native-protocol-tcp auth-ip-acl=127.0.0.1
load-module module-zeroconf-publish
The first line you edit to add your home network's general address pool, like so:
load-module module-native-protocol-tcp auth-ip-acl=127.0.0.1;192.168.137.0/24
Replace the .137… bit with whatever's appropriate in your environment: the extra configuration text permits any PC on the 192.168.137.x network to pipe audio to my iMac. You could make that very restrictive if you wanted to: ;192.168.137.82/24 would mean, for example, that only a container with a .82 IP address could send audio my way.
As well as modifying that first line, make sure both lines are uncommented, so that they are operative statements. At this point, re-boot your iMac and the daemon will start up automatically (a manual start can also be effected with the command brew services restart pulseaudio. With MacPorts, it's two separate commands: sudo port unload pulseaudio to stop the process and sudo port load pulseaudio to restart it).
At this point, your macOS install is ready to 'render' any audio stream sent to it from a remote client.
5.2 A Fedora Audio Server
First make sure all the PulseAudio software is installed (it may well already be by default, but no harm in checking):
sudo dnf install pipewire-pulseaudio pulseaudio-utils avahi
Next, copy the default configuration file to your own $HOME folder:
mkdir -p ~/.config/pipewire/pipewire-pulse.conf.d/
cp /usr/share/pipewire/pipewire-pulse.conf ~/.config/pipewire/pipewire-pulse.conf
Edit that copy:
nano ~/.config/pipewire/pipewire-pulse.conf
Add the network listener configuration to the existing file:
{ name = libpipewire-module-protocol-pulse
  args = {
      server.address = [
          "unix:native"
          "tcp:4713"
      ]
      pulse.min.req = 256/48000
      pulse.default.req = 1024/48000
      pulse.max.req = 2048/48000
      pulse.min.quantum = 256/48000
      pulse.max.quantum = 2048/48000
  }
}
Finally, start the appropriate services:
sudo systemctl enable --now avahi-daemon
systemctl --user restart pipewire pipewire-pulse
Be aware of potential firewall issues: PulseAudio and its ilk require port 4713 to be open.
5.3 An Ubuntu Audio Server
The procedure on Ubuntu is almost the same as on Fedora. First install the appropriate software:
sudo apt install paprefs
Next create a configuration folder and file:
mkdir -p ~/.config/pipewire/pipewire-pulse.conf.d/
nano ~/.config/pipewire/pipewire-pulse.conf.d/network.conf
Paste this text into the configuration file:
pulse.properties = {
    server.address = [
        "unix:native"
        "tcp:4713"
    ]
}
Then restart the appropriate services:
systemctl --user restart pipewire pipewire-pulse
Again, remember that if you're running a firewall, port 4713 needs to be opened.
5.4 A Debian Audio Server
Debian is an odd one because some Debian installs (using Gnome, for example) will use PipeWire and some (using XFCE, for example) might be using traditional PulseAudio. Configuration is different, depending on which software stack is in use. So, the first thing is to identify the software in use:
pactl info | grep "Server Name"
If it mentions “PipeWire”, you know you need to do the PipeWire configuration (which is identical to the Ubuntu one described above). If it says “PulseAudio” then the configuration is much more like the macOS one described earlier.
For PipeWire:
sudo apt install pipewire-pulse pulseaudio-utils avahi-daemon
mkdir -p ~/.config/pipewire/pipewire-pulse.conf.d/
nano ~/.config/pipewire/pipewire-pulse.conf.d/network.conf
Paste in:
pulse.properties = {
    server.address = [
        "unix:native"
        "tcp:4713"
    ]
}
Then restart the service:
systemctl --user restart pipewire-pulse
For PulseAudio:
sudo apt install pulseaudio-module-zeroconf avahi-daemon
Then:
nano ~/.config/pulse/default.pa
Create it if it doesn't exist, and add .include /etc/pulse/default.pa at the top. Then, add these lines:
load-module module-native-protocol-tcp auth-ip-acl=127.0.0.1;192.168.137.0/24 auth-anonymous=1
load-module module-zeroconf-publish
Then reboot.
5.5 An Arch Audio Server
Arch uses nothing really 'by default', but the PipeWire approach is more modern and common. If you choose to install PulseAudio, go the macOS route; if you instead install PipeWire, go the Ubuntu-type of route.
6.0 An Ubuntu 25.04 Container as an Audio Client
- The container came up but to a blank, black screen. This is fixed by clicking the container, going to Options, and setting “console mode” to /dev/console. It defaults to tty, which is wrong for this OS.
- The container then came up with text visible on the console, but the text was a nightmare of errors. This is fixed by clicking the container, going to Options, clicking Features and switching “Nesting” on. Reboot the container again and this time you'll see a standard login prompt.
Once networking is OK:
apt update && apt upgrade
useradd -m -s /bin/bash hjr
passwd hjr
apt install wget nano alsa-utils openssh-server pulseaudio
On both the Proxmox host and within your container, issue the command:
getent group audio
You want the container and the host to agree on the group number. In my case, the command returned number 29 both times, so they already agreed. Had they not done so, a groupmod -g 29 audio would have made the container's group number match the hosts'.
Whether they agree or not, you also need to issue this command:
usermod -aG audio hjr
Finish off with:
systemctl enable ssh
systemctl start ssh
export EDITOR=nano
visudo
Find the line where root is mentioned as having “ALL (ALL:ALL) ALL” privileges and, immediately under that, add your new unprivileged user to the file. My line ended up as:
hjr ALL=(ALL:ALL) ALL
Save the file, then reboot the container. When it comes back up, you can now log in to it from your usual PC and using the unprivileged user account. Having done so, type the command:
aplay -l
At this point, no audio devices were present: that's pretty unique to Ubuntu, to be honest.
The fix is to switch back to the Proxmox host's shell and type:
ls -l /dev/snd
My output was:
root@copland:~# ls -l /dev/snd
total 0
drwxr-xr-x 2 root root       60 Feb 28 17:07 by-path
crw-rw---- 1 root audio 116,  9 Feb 28 17:07 controlC0
crw-rw---- 1 root audio 116,  7 Feb 28 17:07 hwC0D0
crw-rw---- 1 root audio 116,  8 Feb 28 17:07 hwC0D2
crw-rw---- 1 root audio 116,  3 Feb 28 17:07 pcmC0D0c
crw-rw---- 1 root audio 116,  2 Feb 28 17:07 pcmC0D0p
crw-rw---- 1 root audio 116,  4 Feb 28 17:07 pcmC0D3p
crw-rw---- 1 root audio 116,  5 Feb 28 17:07 pcmC0D7p
crw-rw---- 1 root audio 116,  6 Feb 28 17:07 pcmC0D8p
crw-rw---- 1 root audio 116,  1 Feb 28 17:07 seq
crw-rw---- 1 root audio 116, 33 Feb 28 17:07 timer
Based on these devices, I then issued this command:
nano /etc/pve/lxc/100.conf
…and add the entries:
lxc.mount.entry: /dev/snd/controlC0 dev/snd/controlC0 none bind,optional,create=file,gid=29,mode=0660
lxc.mount.entry: /dev/snd/pcmC0D0p dev/snd/pcmC0D0p none bind,optional,create=file,gid=29,mode=0660
lxc.mount.entry: /dev/snd/timer dev/snd/timer none bind,optional,create=file,gid=29,mode=0660
lxc.apparmor.profile: unconfined
lxc.cgroup2.devices.allow: c 116:* rwm
Restart the container and log back on:
hjr@ubuntuct:~$ aplay -l
**** List of PLAYBACK Hardware Devices ****
card 0: PCH [HDA Intel PCH], device 0: ALC293 Analog [ALC293 Analog]
  Subdevices: 1/1
  Subdevice #0: subdevice #0
card 0: PCH [HDA Intel PCH], device 3: HDMI 0 [HDMI 0]
  Subdevices: 1/1
  Subdevice #0: subdevice #0
card 0: PCH [HDA Intel PCH], device 7: HDMI 1 [HDMI 1]
  Subdevices: 1/1
  Subdevice #0: subdevice #0
card 0: PCH [HDA Intel PCH], device 8: HDMI 2 [HDMI 2]
  Subdevices: 1/1
  Subdevice #0: subdevice #0
That means the non-root user can see (and use!) audio devices. It also means that plughw:0,0 should be the device we tell Giocoso to use (because it's the only one that isn't a HDMI interface!). Now, as the non-root user, issue the command:
echo "export PULSE_SERVER=192.168.137.13" >> ~/.bashrc
This is an instruction to the container that whenever audio is played, it should be streamed out over the network to whatever device has been assigned IP address 192.168.137.13: in my case, that's the IP address of my iMac. I hasten to add that the iMac needs to be running PulseAudio itself for that to work (a brew install pulseaudio sorted that out quickly enough). Once installed, PulseAudio actually has to be running, of course, on the iMac:
brew services start pulseaudio
After that, edit /opt/homebrew/etc/pulse/default.pa (if you're on an older Mac and thus installed Pulseaudio with sudo port install pulseaudio, the file path would be: /usr/local/etc/pulse/default.pa). Find the lines:
load-module module-native-protocol-tcp auth-ip-acl=127.0.0.1
load-module module-zeroconf-publish
The first line you edit to add your home network's general address pool, like so:
load-module module-native-protocol-tcp auth-ip-acl=127.0.0.1;192.168.137.0/24
(Replace the .137… bit with whatever's appropriate in your environment). As well as modifying that first line, make sure both lines are uncommented, so that they are operative statements. At this point, re-boot your iMac and the daemon will start up automatically (a manual start can also be effected with the command brew services restart pulseaudio)
Now install Giocoso.
wget software.bbritten.com/gioinst
bash gioinst
giocoso
In the configuration options, specify plughw:0,0 as the audio device and also say yes to force the use of pulse audio. Once done, and assuming you've created a database of your music files, you'll find that music played from within the container will sound out correctly on the 192.168.137.13 device (which happens to be my iMac!)
7.0 A Fedora Container as an Audio Client
1. build a Fedora 43 Container
It needs to be privileged, because we're going to get it to mount my music via NFS After it's built, but before you start it, issue the command:
pct set 100 -mp0 /mnt/netmusic,mp=/netmusic
…from the Host shell (not the container's shell) and with the container stopped. That's creating a mountpoint within the container called /netmusic to which the host's /mnt/netmusic is mapped. When you restart the container, it will have access to the entire music collection.
Once it's built:
useradd -m hjr
passwd hjr
3. Networking doesn't work out of the box. Type this:
cat <<EOF > /etc/systemd/network/20-wired.network
[Match]
Name=eth0
[Network]
DHCP=yes
EOF
Then:
sudo systemctl enable --now systemd-networkd
sudo systemctl enable --now systemd-resolved
dnf update
dnf install wget ncurses nano alsa-utils pipewire-utils openssh-server
export EDITOR=nano
visudo
##
## Allow root to run any commands anywhere
root    ALL=(ALL)       ALL
hjr     ALL=(ALL)       ALL          #<====Add this line!
Then:
systemctl start sshd
systemctl enable sshd
You now need to enable audio. On the Proxmox host, find the group number of the audio group:
getent group audio
You'll likely get a group number of “29”. The same command run inside the Fedora container will probably be “63”. They need to be identical, so back in the Fedora container:
groupmod -g 29 audio
usermod -aG audio hjr
The last command there puts you into the audio group. Finish off with:
reboot
When the container comes back up, log in as yourself, not root, and then issue the command:
aplay -l
…which will tell you the audio devices that the container can see. Now you are ready to install Giocoso, best done over an ssh link using a local terminal that you know supports sixel graphics (such as iTerm2 on macOS):
wget software.bbritten.com/gioinst
bash gioinst
When it's running, configure (1) force the use of pulseaudio and (2) the use of an appropriate hardware device for audio (such as “plughw:1,0”). Exit Giocoso.
For audio to be piped over the network to your local PC from the Fedora Container, you need two things: 1) Pulseaudio running on your local PC and 2) an environment variable on the Fedora Container which tells it which pulseaudio server to pipe music to.
On macOS, therefore: brew install pulseaudio to get PulseAudio installed. On most Linux distros, it's probably already present. Then, on macOS:
nano /opt/homebrew/etc/pulse/default.pa
Find the line which reads load-module module-native-protocol-tcp and make sure it ends up reading:
load-module module-native-protocol-tcp auth-ip-acl=127.0.0.1;192.168.137.0/24 auth-anonymous=1
That lets any host on my local 192.168.137.x network pipe audio to my iMac, and without having to authenticate. So that's my iMac client ready to receive audio.
In the Fedora container:
echo "export PULSE_SERVER=192.168.137.13" >> ~/.bashrc
That tells the bashrc file to say that my iMac at 192.168.137.13 is where audio should be directed. Close the terminal then re-launch a new ssh session to the container (thus ensuring that the new environment variable is picked up and applied). Giocoso in the Fedora container should now be able to play music and have it sound out on your iMac.
8.0 A Linux Mint Container as an Audio Client
Visit https://images.linuxcontainers.org/images/mint/. Navigate to the latest version and image you want. I went for x86_64 Wilma, dated to February 2026: find the URL for the root.tar.xz file (mine ended up being https://images.linuxcontainers.org/images/mint/wilma/amd64/default/20260227_08%3A51/rootfs.tar.xz) Copy that URL/Link. In the Proxmox interface, click on local storage device → CT Templates → Download from URL → paste in the URL. Once the template is downloaded, you can create a new CT container and point it to the root.tar.xz template.
Note that Mint has networking working by default.
apt install wget ncurses-bin nano alsa-utils pipewire openssh-server
useradd -m -s /bin/bash hjr passwd hjr
export EDITOR=nano visudo
Add the line
hjr ALL=(ALL:ALL) ALL
reboot log in as hjr
wget software.bbritten.com/gioinst bash gioinst
Set the pipewire redirect:
echo “export PULSE_SERVER=192.168.137.13” » ~/.bashrc
Mint gets its user IDs confused.
id hjr shows 1001, id ubuntu shows 1000. That's wrong for me: my NFS server has hjr as user 1000. We need to swap them around. So log out of the container, completely. From the Proxmox host, open a shell and type:
pct enter 1xx
…to gain direct access to the container. Then:
usermod -u 2000 ubuntu groupmod -g 2000 ubuntu
usermod -u 1000 hjr groupmod -g 1000 hjr
chown -R hjr:hjr /home/hjr
Reboot the container. Ownership of the NFS mount should now be correct.
Disconnect and re-connect to have the new setting applied. Configure Giocoso to use PulseAudio.
You'll also need to do this:
sudo apt install file
This is an unusual one: file is a standard part of full-fat desktop Mint, but it's missing from the container template. Without it, Giocoso cannot detect FLACs in a folder. You'll get 'invalid or missing FLAC' error messages if it's not present on the system. Manually installing it makes Mint play music over the network to the iMac perfectly, however.
9.0 An Arch Container as an Audio Client
The template is obtainable from https://images.linuxcontainers.org/images/archlinux/current/amd64/default/20260228_04%3A18/
pick the rootfs.tar.xz one. Copy the path to that link, then in Proxmox do a download from URL.
After building the Arch container, networking may not work because of a networking misconfiguration. Check the contents of the folder /etc/systemd/network. You should find a file with a name like eth0.network. Edit that in nano. Mine looked like this:
[Match]
Name = eth0

[Network]
Description = Interface eth0 autoconfigured by PVE
DHCP = no
IPv6AcceptRA = false
…which is almost correct: I just needed to change the DHCP = no line to read DHCP = yes, then issue the command:
systemctl restart systemd-networkd
…after which a “ping google.com” worked fine.
However, a pacman -Syu will still fail with complaints about “error: restricting filesystem access failed because Landlock is not supported by the kernel!”
This is a separate issue and the fix is to nano -c /etc/pacman.conf and around line 39 and 40, uncomment the lines about 'DisableSandboxFilesystem' and 'DisableSandboxSyscalls'. When both are uncommented, save the file and pacman will work.
pacman -S wget nano alsa-utils openssh pulseaudio
groupmod -g 29 audio
systemctl start sshd
useradd -m -s /usr/bin/bash hjr
passwd hjr
usermod -aG audio hjr
shutdown -h 0
With the container shutdown & powered off, go to the Host shell and type:
pct set 101 -mp0 /mnt/netmusic,mp=/netmusic
…to inject a mountpoint of your music that the container (numbered 102 on my system) can then access. Next, still in the Host shell, type:
nano /etc/pve/lxc/102.conf
…and paste the lines:
lxc.mount.entry: /dev/snd/controlC0 dev/snd/controlC0 none bind,optional,create=file,gid=29,mode=0660
lxc.mount.entry: /dev/snd/pcmC0D0p dev/snd/pcmC0D0p none bind,optional,create=file,gid=29,mode=0660
lxc.mount.entry: /dev/snd/timer dev/snd/timer none bind,optional,create=file,gid=29,mode=0660
lxc.apparmor.profile: unconfined
lxc.cgroup2.devices.allow: c 116:* rwm
Save and power on the container. Log on as hjr and do: aplay -l: you should see audio devices. Next, as the non-root user:
echo "export PULSE_SERVER=192.168.137.13" >> ~/.bashrc
Then:
su - root
export EDITOR=nano
visudo
…and assign the same privileges to the non-root user as root has:
## User privilege specification
##
root ALL=(ALL:ALL) ALL
hjr  ALL=(ALL:ALL) ALL
Exit back to being the non-root user. You're ready to install Giocoso. Note that no GUI is required for this. You will, of course, need to create a music database, configure Giocoso to use PulseAudio and also tell it which audio hardware to user (plughw:0,0 for example), depending on your output from aplay -l (though I left mine at “default” and it still played music over the network to my iMac).
Note that Arch ships an apparently broken version of img2sixel, which means that the program logo and album art won't be displayed in your sixel-capable terminal when you ssh into the container. That is, however, fixable:
sudo pacman -S --needed base-devel git
git clone https://aur.archlinux.org/yay-bin.git
cd yay-bin
makepkg -si
Compile All, say no to seeing dependencies, let the compilation complete: you now have yay, a package manager that can install from the Arch User Repository, enabling the installation of a working version of img2sixel. Next:
yay -S libsixel-git
Again, Compile All, No dependencies. At the very end of the compilation process, it will complain that the new package clashes with the existing libsixel:
:: libsixel-git-r3422.a4112363-1 and libsixel-1.10.5-1 are in conflict. Remove libsixel? [y/N] y
As shown, your response must be to say 'yes', remove the existing (broken) package. After that, once the new package has been installed, you can re-launch Giocoso and it will now display album art. You may need to use the Administration menu, Option 2 to set the image size to something large, like 610. Some experimentation may be needed to get the size precisely correct for your particular setup (it depends on things like your choice of terminal font, for example).